| IN THIS ISSUE |
|
|
|
A monster issue with 14 pages and 22 diagrams! Many kings with
many problems. You'll be castling in your sleep after this issue.
Think of all the tactics you won't have to worry about with your
king safely behind your g-pawn.
Disaster can strike at any time, even in the opening. You'll see
a few classic tactics that you might recognize. You'd better make
sure you know them well or you could be on the wrong end!
We end with an epic endgame lesson with some new terminology and
some old-school methods. Learn how to corral those knights for good.
|
Q&A: We
need your chess questions and games in PGN for our Ask the Masters
section. Send them to whitebelt@chessninja.com.
Download all the chess material and annotations in this issue in
PGN format (text or reader software) here.
In ChessBase (Fritz, etc. format (CBV) here.
Online replay page here.
Download this issue in
Adobe Acrobat format (.pdf) with all graphics included. Perfect
for offline viewing and easy printing. You'll need to install the
free Acrobat
Reader first.
FEEDBACK: Post your comments in the ChessNinja message
boards or e-mail us at whitebelt@chessninja.com. |
 |
The Centralized King?
This week's reader game illustrates the danger of leaving your
king in the center. It is also a good example of how quickly opportunities
can slip through your fingers. Even if you have a great position
the initiative is crucial. Don't let your attack fizzle out at the
first sign of counterplay. Sometimes you have to take a few hits
in order to land the knockout blow.
SJiveh8814 (1774) - FirebrandX (1730)
Internet, 31.03.2003
1.e4 g6 2.f4 Bg7 3.Bc4? The saying "knights before bishops"
is an old one for good reason. The best squares for the knights
are relatively obvious: c3 and f3. You KNOW if you play Nf3 here
it's not going to be a mistake. But when a bishop comes out early
your opponent can react to its placement and limit its scope. For
example, as in this game.
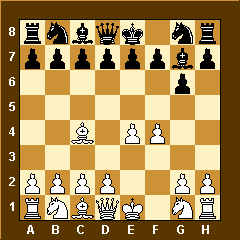 3...e6
Maybe a little early for this, but the idea is definitely correct.
The a2-g8 diagonal is usually a good one for a bishop because it
intersects f7, the weakest square in the enemy position. It is the
only square that is only protected by the king. But after ..e6 the
bishop on c4 is, as we say, biting on granite and looks silly. 3...e6
Maybe a little early for this, but the idea is definitely correct.
The a2-g8 diagonal is usually a good one for a bishop because it
intersects f7, the weakest square in the enemy position. It is the
only square that is only protected by the king. But after ..e6 the
bishop on c4 is, as we say, biting on granite and looks silly.
Note that if Black had already played ..e5, then Bc4 is much better
because it can't be so easily blocked out. But here Black can still
play moves like ..c6 and ..d5, stuffing the bishop completely and
developing with a gain of time.
4.Nf3 d5! Freedom for my people! Black develops his queen
and queen's bishop, fights for the center, and all with a gain of
time because the white bishop will have to move. It's like getting
free moves!
5.exd5 exd5 6.Bb5+ It's not necessarily bad to toss in this
check because ..c6 takes the best square away from the b8 knight.
6...c6
|
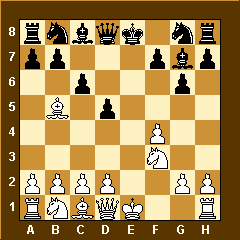 7.Ba4?
But this? It's going to take this bishop a long time to get
back into the game with that black pawn chain b7-c6-d5 in its face.
Be2 kept it in play and on the right side of the fence. 7.Ba4?
But this? It's going to take this bishop a long time to get
back into the game with that black pawn chain b7-c6-d5 in its face.
Be2 kept it in play and on the right side of the fence.
7...a5?! Not bad, but Black is guilty of playing an inferior
move while looking for a trap. He's hoping White won't notice the
threat of ..b5 and ..a4, trapping and winning the bishop. The move
also gains space on the queenside, not a bad thing.
The problem is that White has a defense that is a move he wants
to play anyway: c3. That would give his bishop an escape square
on c2 where it would be back in the game. Playing for traps is okay
if the moves are otherwise justified, but don't force your opponent
to play good moves!
8.a3? White sees the threat of ..b5 and ..a4, but opens
up the wrong escape square. Why is he so in love with the a7-g8
diagonal when it is completely closed off? [8.c3]
|
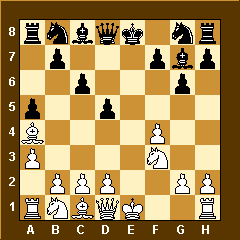 8...Nf6?!
Why not continue with the plan started with ..a5? Bury that
bishop and gain space with ..b5 and ..a4! Now White still has a
chance to play c3 and get his bishop back in the game from c2. 8...Nf6?!
Why not continue with the plan started with ..a5? Bury that
bishop and gain space with ..b5 and ..a4! Now White still has a
chance to play c3 and get his bishop back in the game from c2.
This move is also a little dubious because it blocks in the fine
g7 bishop. With the a1-h8 diagonal open for that monster bishop
it is going to be hard for White to develop his queenside. The knight
could come out to e7, perhaps heading to f5. [8...b5 9.Bb3 a4 10.Ba2]
9.d4 0-0 10.c3 The white king is still sitting in the center,
creating tactical chances for Black. Because of the poor 3.Bc4 move
White has lost a lot of time and is now behind in development. 10...Bf5
A routine move that allows White to castle. Why not develop
the rook to the center with check, gaining time? [10...Re8+ 11.Ne5
Bg4 Again developing with gain of TEMPO. Free moves! 12.Qd3 (12.Qd2
Ne4) 12...Bf5 13.Qf3 b5]
11.Ne5 Nbd7 12.Bc2 Ne4 13.Qf3? What does White have against
castling?! Now things get ugly against his exposed king. Get your
main man out of traffic before he gets hit by a bus. This move doesn't
do anything at all and leaves the bishop on c2 without protection.
13...Nxe5 14.fxe5
|
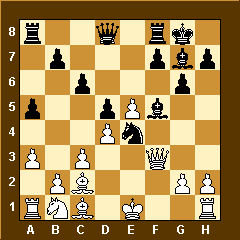 14...Ng3?
One point for seeing the discovered attack tactic on the c2
bishop. Minus three points for believing it was a good move just
because it was possible! Don't fall in love with cute moves, they'll
break your heart in the end. Just because a tactic is possible doesn't
mean the resulting position is better for you. 14...Ng3?
One point for seeing the discovered attack tactic on the c2
bishop. Minus three points for believing it was a good move just
because it was possible! Don't fall in love with cute moves, they'll
break your heart in the end. Just because a tactic is possible doesn't
mean the resulting position is better for you.
Meanwhile, Black could have followed-up his fine opening play and
taken advantage of his lead in development with 14...f6!. That would
open lines, which is almost always good for the better-developed
side. It would open the f-file for the f8 rook to attack the white
queen on f3 and threaten to open the e-file against the sitting
duck white king.
[14...f6! 15.exf6 Qxf6 16.0-0 Qh4 17.Bf4 Rae8 Black lead in development
and central control is close to overwhelming.]
15.hxg3? Seduced by the open h-file, we can only assume.
But the problem is the e-file and the king sitting on e1. Beep beep!
It wouldn't take more than a minute to see that White has no real
chances of attacking on the h-file.
[15.Qxg3 Bxc2 16.0-0 And Black has little to show for his adventure.]
15...Bxc2 16.Nd2 Where is this poor beast going? Even worse
it stuffs the bishop. 16...Qe7 [16...f6 Play the most forcing
moves first. The Black queen might want to play to another square
later, but you KNOW ..f6 is coming, so play it first.] 17.g4?
Fiddling while Rome burns, still dreaming of Qh3-Qxh7 mate.
Does White know that you only get to play one move at a time?
|
 17...f6!
Can you hear the bus coming? 18.Qh3 At least he's consistent.
The most amusing part of this is that there isn't even a mate threat
on h7 anymore and Black could have just ignored it completely and
continued with his own attack. Qh3 opened up the f3 square for the
knight, so White's position is almost looking reasonable after that. 17...f6!
Can you hear the bus coming? 18.Qh3 At least he's consistent.
The most amusing part of this is that there isn't even a mate threat
on h7 anymore and Black could have just ignored it completely and
continued with his own attack. Qh3 opened up the f3 square for the
knight, so White's position is almost looking reasonable after that.
18...h6?! Reflex, but not best.
18...fxe5! 19.Qxh7+ Kf7 20.0-0+ Ke6 Safe! Black development advantage
is massive and he is threatening to win the white queen with ..Rh8.
White is doomed. This looks a little scary, but to succeed at chess
you have to DO THE MATH when it is required.
Don't think "Eek, he can take on h7 with check" and play a lazy
move. There was no real threat at all and Black gained a move for
his own attack by capturing on e5.
When you are in an attack/counterattack situation you should only
play a defensive move when it is absolutely required, or if you
can really shut down your opponent's attack completely with a well-timed
defensive shot. The best defense is a good offense, as the saying
goes.
19.Nf3 The worst is over for White now. Black is still much
better because of the two bishops and the fractured white pawns
on the kingside. There is still a lot of chess ahead. 19...fxe5
|
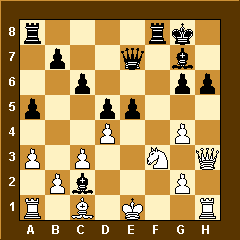 20.Nxe5??
Well, never mind! Instead of giving up a pawn and escaping with
his king, White decides to go down in a big ball of fire. Nothing
more than he deserved after leaving his king in the middle for so
long, I suppose. 20.Nxe5??
Well, never mind! Instead of giving up a pawn and escaping with
his king, White decides to go down in a big ball of fire. Nothing
more than he deserved after leaving his king in the middle for so
long, I suppose.
[20.dxe5 The only move. 20...Bxe5 21.0-0! At last! A pawn is a
small price to pay for getting the king out of traffic.]
20...Bxe5 21.Kd2 Hari-kiri to end the suffering. Now it's
mate in three. Capturing dragged things on into a lost rook endgame.
[21.dxe5 Qxe5+ 22.Qe3 (22.Be3 Rae8 23.Qxh6 Qxe3+ The simplest,
although ..g5 is faster according to Fritz.
(23...g5! Covering h7 with the bishop and cutting
off the queen's protection of the bishop. 24.Qh3 Bg6 In
general play for the most direct road to victory. Black has a tremendous
attack going, so why trade down into a rook endgame if you can wrap
things up quickly? Only if you are unsure about how much counterplay
your opponent is getting should you bail out of a strong attack.
25.Ke2 d4 26.cxd4 Qb5+ 27.Ke1 Qd3 Crunch! 28.Qh8+
Kf7 29.Rf1+ Qxf1+! 30.Kxf1 Rxh8)
24.Qxe3 Rxe3+ 25.Kd2 Rg3 26.Kxc2 Rxg2+ 27.Kd3 Rf3+ 28.Kd4 Rxb2)
22...Rae8 23.Qxe5 Rxe5+ 24.Be3 (24.Kd2 Rf2#) 24...Rxe3+
25.Kd2 Rg3 26.Kxc2 Rxg2+ 27.Kb3 a4+! 28.Ka2 (28.Kxa4 Rxb2
29.Ka5 Ra8#) 28...Rff2 29.Rab1 Total domination.]
21...Rf2+ 22.Ke1 [22.Ke3 Bg3#]
|
| 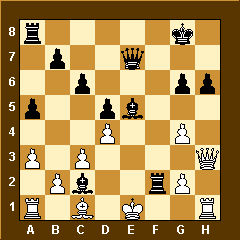 22...Bg3+!
The cleanest finish. The joys of discovered check! Fitting that
the king expires on the square he refused to leave for the entire
game. The white queen and rook are still sitting on the edge, dreaming
of an h-file mate that will never come. 0-1 22...Bg3+!
The cleanest finish. The joys of discovered check! Fitting that
the king expires on the square he refused to leave for the entire
game. The white queen and rook are still sitting on the edge, dreaming
of an h-file mate that will never come. 0-1
[22...Bg3+ 23.Be3 Qxe3#]
Online
replay page
|
 |
Classic Opening Tactics
If you would like to inflict opening disasters
instead of suffer them, go through these eight games carefully.
Tactical alertness is required even in the first dozen moves.
Most of these disasters can be attributed to the same factors. 1)
Lack of development. 2) Leaving the king in the center. 3) Greed.
4) Ignoring weak spots, particularly f7 (f2 for white).
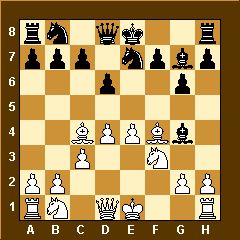 (1)
Karg,L - Baptistella,J [C34] (1)
Karg,L - Baptistella,J [C34]
Bahn-chN Borkum (5), 1996
1.e4 e5 2.f4 exf4 3.Nf3 g6 4.Bc4 d6 5.d4 Bg4 6.Bxf4 Bg7 7.c3
Ne7
DIAGRAM 8.Bxf7+! Ah, nothing
like the classics! A bishop on c4 aiming at f7, what could be sweeter?
The knight on e7 blocks the black queen's coverage of the key g5
square, creating all the conditions for this famous combination.
If we had a penny for every time someone fell for this one the
Ninjas would have swords made of solid gold. f7 f7 f7!
8...Kxf7 9.Ng5+ Kg8 10.Qxg4 Qd7 11.Ne6 Kf7 12.d5 h5 13.Qf3 c6
14.Be5+ And a discovered check to finish, just for fun. 1-0
|
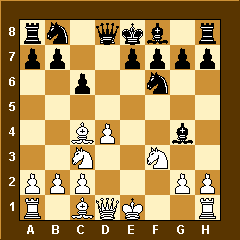 (2)
Lewald,S - Strauss,P [D00] (2)
Lewald,S - Strauss,P [D00]
Bahn-chV Borkum (2), 1996
1.e4 c6 2.d4 d5 3.Nc3 dxe4 4.Bc4 Nf6 5.f3 exf3 6.Nxf3 Bg4
DIAGRAM 7.Bxf7+ Look familiar?
Here the bishop on g4 is protected, but the availability of e5 allows
for a fork instead of just a check on g5 as in #1. 7...Kxf7 8.Ne5+
Kg8 9.Nxg4 Qe8 10.0-0 Material is equal but the black king is
a mess and white has a dangerous lead in development.
10...Nbd7 11.Qe2 Qh5?? Not happy with falling for this trick
once, black goes for it again, putting his queen in a perfect place
for a discovered attack with check. Now the sacrifice is on f6 instead
of f7, but the spirit is the same. 12.Rxf6! exf6 13.Nh6+ Winning
the queen. 1-0
|
 (3)
Richardson,B - Charles,F [B12] (3)
Richardson,B - Charles,F [B12]
NATO-chT Viborg (3), 1996
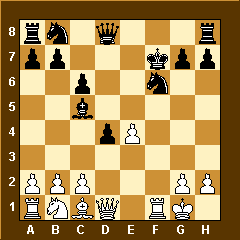
1.e4 c6 2.d4 d5 3.f3 dxe4 4.fxe4 e5 5.Nf3 Nf6 6.Bc4 exd4 7.0-0
Bc5 8.Ne5 Be6 9.Nxf7! Bxf7 10.Bxf7+ Kxf7
DIAGRAM 11.Qh5+ A fork thanks
to a pin. The knight can't move because of the rook on f1 and now
the bishop on c5 is in the air. 11...Kg8 12.Qxc5 Nxe4 13.Qf5
Nf6 14.Qe6+ Kf8 15.Bf4 Black has no way to stop the deadly 16.Bd6+.
1-0
|
 (4)
Clark,M - Kelly,M [C30] (4)
Clark,M - Kelly,M [C30]
Kilkenny op (2), 1996
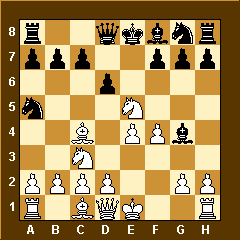
1.e4 e5 2.f4 d6 3.Nf3 Bg4 4.Bc4 Nc6 5.Nc3 Na5 6.Nxe5? White
must have been excited to play this, but it doesn't work here because
the black queen can move with check. But black is kind enough to
allow this classic to finish the way it usually does. A free queen!
DIAGRAM 6...Bxd1?? [6...Qh4+
7.g3 dxe5 8.gxh4 Bxd1 9.Bb5+ c6 10.Kxd1 cxb5 And black is better.]
7.Bxf7+ Ke7 8.Nd5#
No matter how many times we see it, we love it. How many times
have you had the opportunity for this and let it pass by? 1-0
|
 (5)
Baertsch,J - Remeta,V [A02] (5)
Baertsch,J - Remeta,V [A02]
Weihnachts op-B Zuerich, 1996
1.f4 e5 2.fxe5 d6 3.exd6 Bxd6 4.Nf3 Believe it or not,
this is a known opening called the From's Gambit by black against
white's Bird's Opening.
Our words of wisdom? Give yourself a chance to play an entire game
instead of risking death in a crazy opening. You can't win in the
opening against solid play, so stick with the sane stuff, develop
your pieces, castle, and play chess.
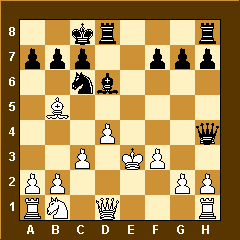
4...Bg4 5.d4 White is already lost thanks to the weakness
of f2 (the white equivalent of f7). 5...Bxf3 6.exf3 Qh4+ 7.Ke2
Nc6 8.c3 0-0-0 9.Be3 Nf6 10.Kd2 Nd5 11.Bb5 Trying to get aggressive
with his king in traffic, not good. 11...Nxe3 12.Kxe3 DIAGRAM
12...Qg5+ Yep, that's a fork. 13.Kf2 Qxb5 0-1
|
 (6)
Buergi,J - Wagner,S [C55] (6)
Buergi,J - Wagner,S [C55]
Weihnachts op-B Zuerich, 1996
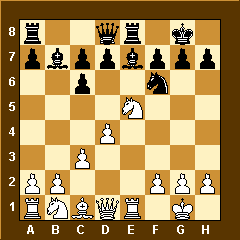
1.e4 e5 2.Nf3 Nc6 3.Bc4 Nf6 4.0-0 Nxe4? 5.Bd5 Nf6 6.Bxc6 bxc6
7.Nxe5 Be7 8.d4 Bb7 9.Re1 0-0 10.c3 Re8 Just because you have
castled doesn't mean you can forget about f7. Black moves the rook
and suddenly f7 has the same weakness it does in the beginning.
It is only protected by the king.
DIAGRAM 11.Qb3 Bingo! Forking
f7 and the unprotected bishop on b7. Leaving the powerful knight
on e5 costs black. 11...Rb8 Going out with a bang. [11...Qc8
12.Qxf7+ Kh8 13.Ng6+ hxg6 14.Rxe7 Rxe7 15.Qxe7]
12.Nxf7 Winning the queen or mating. 12...Ba6 [12...d5
13.Nxd8] 13.Nh6+ Beginning a famous mating sequence, called
"Philidor's Legacy" by some, although it dates back to
the 15th century! 13...Kh8 14.Qg8+ Rxg8 15.Nf7# Sweet!
1-0
|
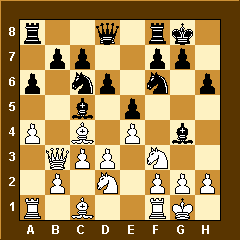 (7)
Suarez,A - Blanco Menendez,R [C53] (7)
Suarez,A - Blanco Menendez,R [C53]
Asturia-Galicia U16, 1997
1.e4 e5 2.Nf3 Nc6 3.Bc4 Bc5 4.c3 d6 5.d3 h6 6.a4 a6 7.0-0 Bg4
8.Nbd2 Nf6 9.Qb3 0-0
DIAGRAM 10.Qxb7?? Greed kills.
10...Na5 The queen is trapped. 0-1
|
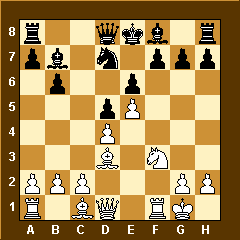 (8)
Redondo Arguelles,L - Suarez,A [B12] (8)
Redondo Arguelles,L - Suarez,A [B12]
Asturia-ch U18 Asturia, 1997
1.e4 c6 2.f3 d5 3.d4 dxe4 4.fxe4 Nf6 5.Nc3 e6 6.Nf3 Nbd7 7.Bd3
b6 8.0-0 Bb7? Black is sleepwalking! White already has a space
and development advantage and allowing the push e5 is more than
the black position can handle. 9.e5 Nd5? Still unaware of
the problem on f7. [9...Ng4] 10.Nxd5 cxd5
DIAGRAM 11.Ng5 Is chess this
easy?! f7 cannot be defended. 11...Nxe5 [11...f5 12.Nxe6
Qb8 13.Bxf5] 12.dxe5 Bc5+ 13.Kh1 Rf8 14.Bb5+ Ke7 15.Nxf7 Massacre!
The knight gets out of the way of the bishop. Bg5+ is going to be
lethal. 1-0
Online
replay page
|
 |
Major Minor
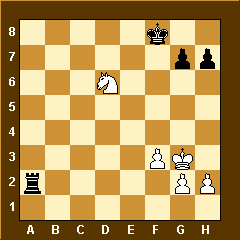 A
few weeks ago (WB #16) we gave you the below position to work on.
Many readers have said that they had trouble winning against their
computers with black. First of all, maybe you have your computer
on a high level. A
few weeks ago (WB #16) we gave you the below position to work on.
Many readers have said that they had trouble winning against their
computers with black. First of all, maybe you have your computer
on a high level.
With the best defense it is very hard, or even impossible, for
black to win, but in practice (among humans!) the rook usually wins.
Why? First we recommend trading places and trying to defend with
white against your computer.
One of the problems white has here is that his f-pawn is advanced.
This looks insignificant, but it matters because it makes it much
easier for the black king to penetrate behind the white pawns. You
can't win with the rook alone or by a frontal attack.
The other good thing for black is that his pawns are still at home.
This means that they are harder for white to attack when black goes
after the white pawns.
This is a good example of how general guidelines can provide guidance
in endgames. Pushing the black pawns is wrong because it would make
it easier for white to gain counterplay. In some cases it might
be necessary to move a pawn to protect it or take an important square
away from white, but this should be done with caution. Black doesn't
want to allow pawn exchanges, something that obviously becomes more
likely if the pawns come into contact with the enemy pawns.
White won't just sit around applauding the black strategy. Because
of the f2 weakness and the ability of the rook to tempo the knight
away from the action, white should play actively.
|
| Dictionary
break: To use tempo in this case means to 'lose a move'
or to make a move that passes to the opponent without changing the
situation. Line pieces like rooks and bishops can usually do this,
knights cannot. Whenever a knight moves it completely changes the
squares it controls.
This means they are often poor at defense against line pieces,
or even pawns. It makes them vulnerable to zugzwang, a German
word (and international chess word) for a position in which you
would be okay if you didn't have to move, but because you do, you
lose something.
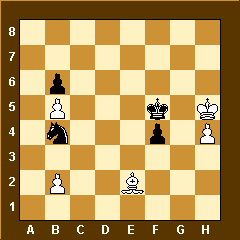 Here
is a great example of zugzwang play against a knight. This is from
the game Nigel Short – Judit Polgar played three days ago
in Budapest. It's White (Short) to move. Here
is a great example of zugzwang play against a knight. This is from
the game Nigel Short – Judit Polgar played three days ago
in Budapest. It's White (Short) to move.
At first it looks like a draw because the white king is trapped
against the wall, making it impossible to promote his h-pawn. If
the white king moves, the black king just mirrors it down the board,
keeping it trapped. If the bishop tries to help, the black f-pawn
runs down the board.
The white b-pawns are clearly useless on their own, although they
will be essential. (White can't win with just the h-pawn because
his bishop is the wrong color! It can't control the queening square.
So the h-pawn will be used a decoy.)
White would like to play Bd3+ to force the black king away, but
the knight controls that square. 1.Bg4+ Kf6 is one try, but the
bishop then has to get out of the way of its king and black uses
that time to attack the b-pawns. What to do?
1.b3! Zugzwang! Black's pieces are perfectly placed so the
worst possible thing is to have to move. Polgar had to break the
defensive arrangement and was soon lost after 1...Nd5 2.Bd3+
Ke5 3.Kg4
|
White has even more problems in the first diagram.
Rooks are good at dominating knights, as are bishops. This isn't
as important when all the pawns are on the same side because the
knight's limited range doesn't hurt it so much. But it will still
come in handy in many cases and it is a good positional device to
be aware of.
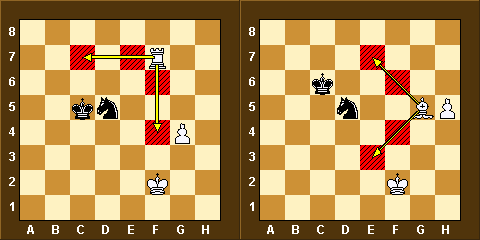
In both of these positions the rook and bishop control half of
the knight's squares and all of the squares in one general direction.
Of course this is even more powerful when the knight is in the corner
or on the side of the board in which case it may have no squares
at all that aren't controlled by the enemy. The domination point
for the rook is two diagonal squares away, for the bishop three
vertical/horizontal squares.
This weakness of the knight means it is vulnerable to being cut
off and killed if it gets too far from its king. Call it corralling
the horse! A rook and king can easily trap a knight and leave it
with no way back to its king and pawns.
|
Finally, let's get back to the endgame we started
with and see how the great Alexander Alekhine, the fourth world
champion, won with black against Milan Vidmar, one of the top players
of his era. (Vidmar was a full-time engineer yet still managed to
be a world-class chessplayer.)
Vidmar tries to play actively but his pawns never make it far enough
to threaten exchanges. Instead they get cut off and his knight is
driven away from them. Don't panic when you see all the variations,
we just wanted include enough of the typical lines to serve as guides.
And most lines are played out to mate or an obvious win, as per
White Belt tradition. No "and Black wins..." when there
is still work to be done!
This is far from a comprehensive analysis of this endgame. Playing
through all these lines and notes will give you a good general idea
of the strategies for both sides. Keep practicing on both sides.
There are a lot of moves below for a White Belt, or any belt for
that matter. But you don't need to memorize them, just play through
them and pay attention to how they exemplify the rules and concepts
we are discussing.
 Vidmar,M
- Alekhine,A [E37] Vidmar,M
- Alekhine,A [E37]
San Remo, 1930
39.h4 Ke7 40.Ne4 h6 Alekhine takes the attractive g5 post
away from the white knight. This is the last pawn move Black will
make! 41.Nf2 Ke6 42.Nd3 Kf5 43.Nf4 Ra4 44.Nd3 Rc4 45.Nf2 Rc6
46.Nh3 Ke5 47.h5 Rc2 48.Nf4 Rd2 Dominating the knight. 49.Nh3
Kd4
Here comes the infiltration. Black can attack the g2 pawn twice.
50.Nf4 Ke3 51.Ne6 Rd5 Defending the g8 pawn tactically. If
White takes it, Rg5+ forks king and knight. 52.f4 Rf5
|
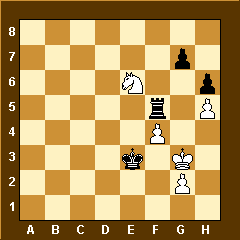 53.Kg4
White declines to exchange pawns with 53.Nxg7 Rxf4, why? Didn't
we say earlier that pawn exchanges are good for White? In general,
yes. If all the pawns come off the board the rook vs knight endgame
is drawn except in exceptional circumstances. 53.Kg4
White declines to exchange pawns with 53.Nxg7 Rxf4, why? Didn't
we say earlier that pawn exchanges are good for White? In general,
yes. If all the pawns come off the board the rook vs knight endgame
is drawn except in exceptional circumstances.
The problem here is that if White captures on g7 his knight ends
up in a very difficult position, far from the protection of his
king and pawns. The knight might be trapped and lost, or the white
king can get into trouble with the knight far away. Remember that
a rook and king are also a potential mating threat!
[53.Nxg7 Rxf4 54.Ne6 (54.Kh3 Rf7 55.Ne6 Re7 56.Nf8 Re5 57.g3 Or
else the white king can be trapped in a mating net. The white knight
has been driven too far away to help defend. (57.Kh4? Rg5 58.g3
Kf3) 57...Kf2! The g-pawn is the key. The white h-pawn is doing
a good job of keeping the white king boxed in, so removing it now
is not helpful.
(57...Rxh5+? This looks obvious, but remember that Black
doesn't want to let the white king approach the only remaining black
pawn. The rook can't win on its own versus the knight. So Black
must be patient and continue to play for domination of the king
instead of grabbing this pawn. 58.Kg4 Rg5+ 59.Kh4 Kf3 60.g4)
58.Kg4 Rg5+ 59.Kf4 Rxg3 60.Nd7 Rf3+ 61.Kg4 Ke3 62.Ne5 Rf4+ 63.Kg3
Ke4 64.Ng4 Rf3+ 65.Kh4 Kf4 66.Nh2 Rf2 67.Kh3 Ra2 68.Ng4 Kg5 69.Ne5
Ra3+ 70.Kg2 Kxh5 71.Kf2 Kh4 72.Kg2 h5 73.Kf2 Kg5 74.Nc4 Ra2+ 75.Kf3
h4 76.Ne3 h3 77.Nf1 Ra3+ 78.Kf2 Kf4 79.Kg1 Rf3 80.Nh2 Rg3+ 81.Kh1
Rd3 82.Kg1 Kg3 83.Nf1+ Kf3 84.Nh2+ Ke2 85.Ng4 Rg3+ 86.Kh2 Rxg4 87.Kxh3
Kf3 88.Kh2 Rh4+ 89.Kg1 Rh3 90.Kf1 Rh1#) 54...Rf5 55.Kh4 Re5]
53...Rf6 54.f5 White is holding things together, but in
order to do so his pawns are getting further apart and overextended.
He won't be able to protect everything. For a knight to defend well
everything has to be compact. Here the white king, knight and pawns
are becoming increasingly uncoordinated. 54...Rf7 55.g3 Ke4
|
| 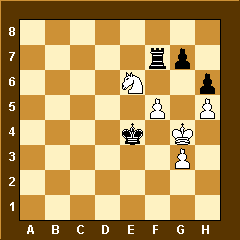 Uh-oh,
here's that zugzwang situation we were talking about. White
is out of moves that don't lose. If the white king moves the black
king captures the f5 pawn. So the knight has to check, but this
just leaves it too far away. 56.Nc5+ Kd4 57.Nb3+ Uh-oh,
here's that zugzwang situation we were talking about. White
is out of moves that don't lose. If the white king moves the black
king captures the f5 pawn. So the knight has to check, but this
just leaves it too far away. 56.Nc5+ Kd4 57.Nb3+
[57.Ne6+ Ke5 58.Nf4 Ke4 59.Ne2 Rxf5 60.Nc3+ Ke5 61.Ne2 Rg5+ 62.Kh4
Kf5 63.Nd4+ Ke4 64.Nc2 Kf3 65.Ne1+ Kf2 66.Nd3+ Ke2 67.Nf4+ Kf3 68.Nd3
Rxg3 69.Ne5+ Kg2 70.Nc6 g5+ 71.hxg6 Rxg6 72.Ne7 Rg5 73.Nc6 Kf3 74.Nd4+
Ke3 75.Nc6 Kf4 76.Nd4 Re5 77.Kh3 Re1 78.Kg2 h5 79.Kf2 Ra1 80.Kg2
h4 81.Kh3 Rh1+ 82.Kg2 Rd1 83.Nf3 h3+ 84.Kf2 Rd3 85.Nh2 Rg3 86.Ke2
Rg2+ 87.Kd3 Rxh2 88.Kc4 Rc2+ 89.Kb3 Rc1 90.Kb4 h2 91.Ka4 h1Q]
57...Ke5 0-1 The f-pawn falls and Vidmar resigned.
Winning this with black is still not trivial against the best defense,
so we'll give some winning examples.
[58.Nd2 Rxf5 59.Nc4+ Ke6 60.Ne3 Rg5+ 61.Kh4 Re5 Driving the knight
away whenever possible. The knight just cannot stop the black rook
and king from penetrating. 62.Nc2 (62.Ng4 Re2 Dominating the knight
again. 63.Kh3 Kf5 64.Kh4 (64.Nh2
|
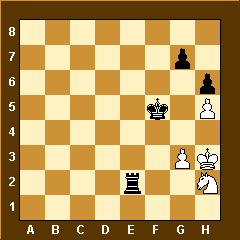 64...Rxh2+!
You have to know which pawn endgames are winning in order to
successfully play the piece endings! The advanced position of the
black king makes this an easy win. 64...Rxh2+!
You have to know which pawn endgames are winning in order to
successfully play the piece endings! The advanced position of the
black king makes this an easy win.
65.Kxh2 Kg4 66.Kg2 Kxh5 67.Kh3 Kg5 68.Kg2 Kg4 69.Kf2 h5 70.Kg2
g5 Grabbing the opposition and pushing the white king away.
71.Kf2 Kh3 72.Kf3 g4+ 73.Kf4 Kg2 74.Ke5 Kxg3) 64...Re4 65.Kh3
Rxg4) 62...Re4+ 63.Kh3 Kf5 64.Na3 Kg5]
Online
replay page
|
| |
| |
|